Arc Raiders Tips I Wish I Knew 500 Hours Ago (Survival & Progression Guide)
If you've just dropped into Arc Raiders for the first time, or even if you've already racked up a solid chunk of hours, there is a very good chance you're leaving value on the table. After 500+ hours of raiding, dying, looting, and dying again, here are the most important survival and progression lessons that took way too long to learn — so you don't have to.
Don't Sleep on the Green Skill Tree
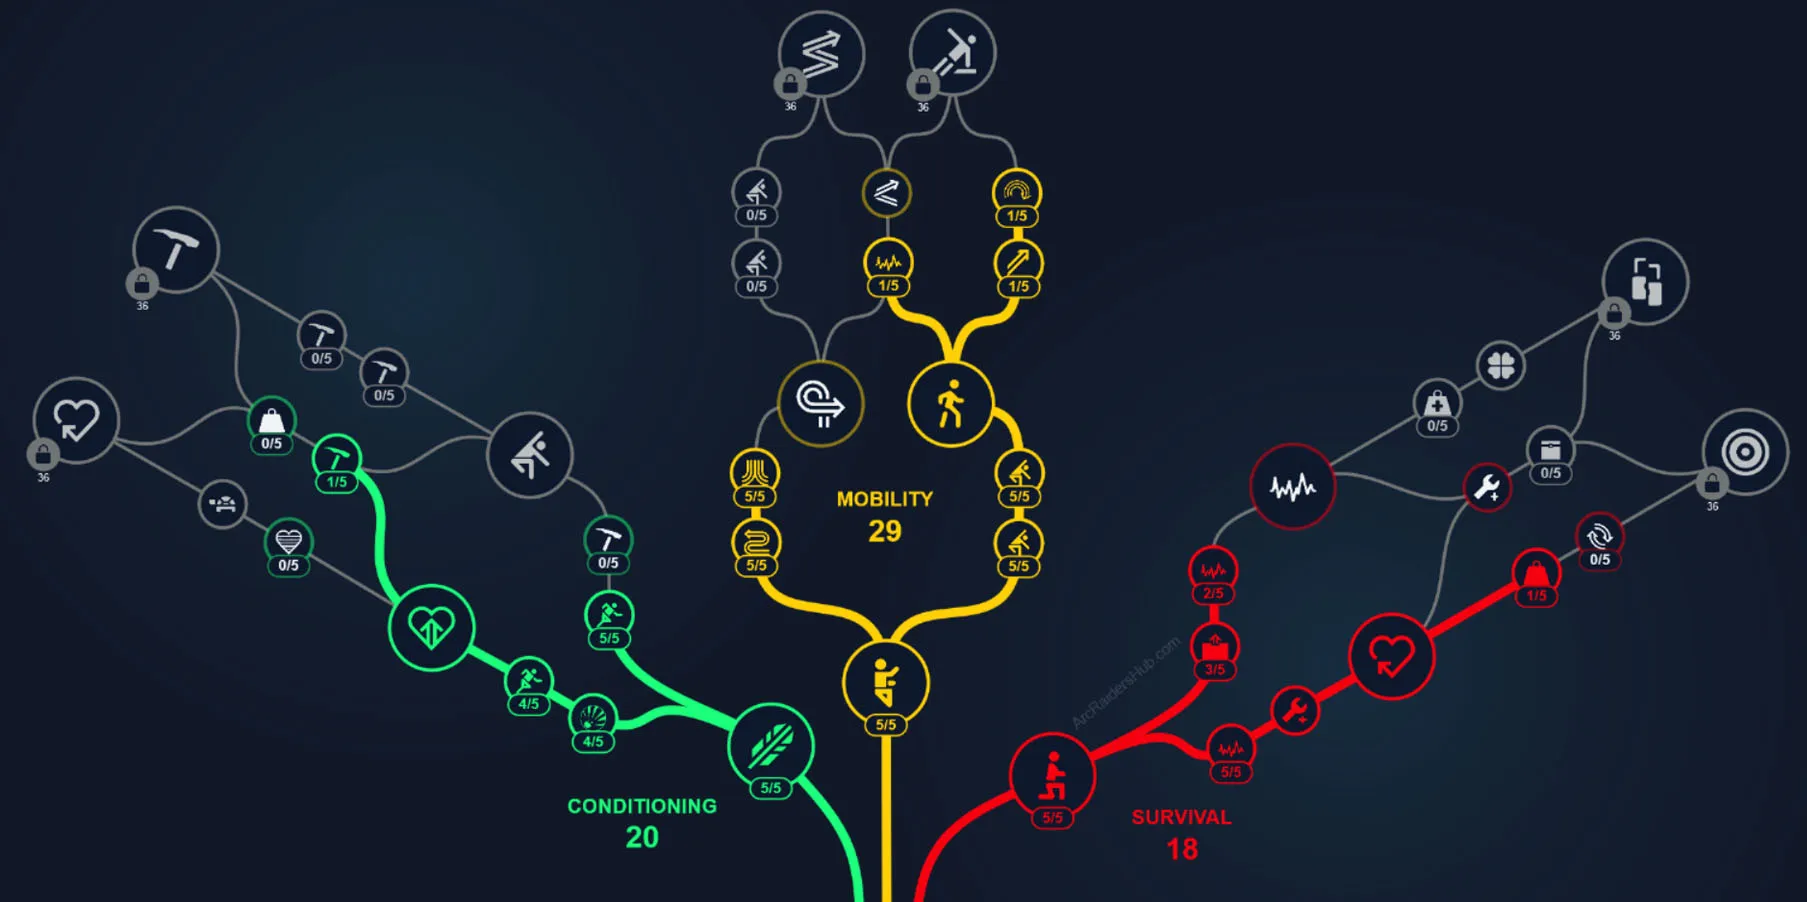 — Green Skill Tree —
Credit: Embark Studios
— Green Skill Tree —
Credit: Embark Studios
Let's address the elephant in the room right away. There's a running joke in the Arc Raiders community that the green skill tree is basically useless. That take is flat-out wrong, and it's costing a lot of players real in-game power.
Yes, not every green perk is a winner — nobody is lining up to spec into Back on Your Feet. But written off entirely? Absolutely not. Here are three green tree perks that genuinely slap:
Used to the Weight
If you play the PvP side of Arc Raiders and run a medium or heavy shield, this perk is a no-brainer. Used to the Weight lets you move noticeably faster while carrying heavier shields, which gives you a meaningful edge in gunfights against other Raiders. Speed wins fights. Simple as that.
Fight or Flight
This is arguably the most underrated perk in the entire game. When you take damage — whether from Arc or from another Raider — you immediately recover a fixed chunk of stamina. That might not sound like much, but when you're desperately trying to reach cover and your stamina bar is bone dry, Fight or Flight can be the difference between surviving and going back to Spiranza empty-handed. The number of players who don't run this perk is genuinely baffling.
Downed But Determined
When you're downed, it takes significantly longer before you fully collapse. In personal testing, this perk can extend your downed time by up to 34 seconds. For solo players, that dramatically improves your odds of a kind stranger with a defib finding you. For squads, it takes the pressure off your teammates — they can focus on winning the fight rather than having to choose between finishing the enemy team or reviving you. A 34-second window is a long time in a firefight.
The green tree isn't the best tree in the game. But if you're ignoring it entirely, you're making a mistake. Do your homework on it before dismissing the whole thing.
Naked Runs Are Better Than Free Kits
This one catches a lot of newer players off guard, but once it clicks, it changes how you play entirely.
What Is a Naked Run?
A naked run means loading into a match with no augment, no shield, no weapon — nothing. Or almost nothing, which we'll get to in a second. Free kits, by contrast, give you a random assortment of gear at no cost: a random gun, a shield recharger, some low-tier healing, a utility item, and a grenade.
Free kits are fine when you're trying to save money. But if your goal is targeted loot farming — going after a specific blueprint, a specific location, or a specific type of item — naked runs are superior in almost every way.
Here's Why Naked Runs Win
Let's say you want to farm augment blueprints from the breachable room in the Security Wing on Blue Gate. You spawn in on the far side of the map. With a free kit, you can try to run across — but odds are good that by the time you arrive, the place has already been cleaned out by faster players. Worse, even if you do get there with a free kit, you have no safe pocket, meaning anything you find can be lost if you die.
With a naked run, the strategy looks like this:
- Load in with just five Adrenaline Shots stuffed in your safe pocket. That's your only item.
- If you spawn too far from your target location, open the menu, hit surrender, and try again. You've lost nothing — your Adrenaline Shots stay safe in your pocket and you don't have to re-craft them.
- When you finally spawn close to your target area, take the Adrenaline Shots out of your safe pocket and sprint straight there, popping one every time your stamina runs dry.
- You arrive first, you have a safe pocket ready for whatever you find, and if you do get taken out, your Adrenaline Shots are safe for the next attempt.
Worried about Arc? Low-level Arc are very manageable to avoid without a weapon. Use doorways, natural cover, and just keep moving. You'll be fine. Naked runs are one of the highest-efficiency farming methods in the game right now.
Understanding Aggression-Based Matchmaking
Embark has confirmed that your in-game behaviour directly influences what kind of lobbies you get placed into. The short version: kill other Raiders, get put in lobbies with more Raiders who also kill. Play peacefully, and over time your matchmaking swings back towards calmer lobbies.
This matters more than people realise. If you've been grinding duos or trios with friends and doing heavy PvP, then when you switch back to solo play, expect your lobbies to be noticeably more violent for a while.
How to Reset Your Matchmaking
The most effective way to swing the pendulum back toward chill lobbies is simple: don't fight back. If another player shoots at you, run. Don't retaliate. It sounds painful, but it works.
A great time to do this is during naked runs. If you load in with only Adrenaline Shots and no weapon, you literally cannot shoot back — which removes any temptation entirely.
A couple of rounds of peaceful looting without engaging any Raiders will get you back into calmer lobbies faster than you might expect. And one more note — even jokingly pulling out your gun at the extraction point and shooting near a fellow Raider is widely believed to count as aggression and keep you in the more violent matchmaking pool. Don't risk it.
You're Probably Using the Wrong Augments
After extensively reviewing and comparing every augment in Arc Raiders, here's an honest take: there are really only three augments worth focusing on for most playstyles.
Tactical Mark 2 — Best for PvP
The Tactical Mark 2 allows you to use medium shields, which are the sweet spot for PvP — solid protection, good utility, and a built-in utility slot. But the real reason to run this augment is its unique trait: auto-deploying a smoke grenade the moment your shield breaks.
This trait is genuinely game-changing in PvP situations. The moment you're vulnerable, you get instant cover. It gives you a real fighting chance to reposition, heal, and re-engage rather than just dying in the open. It also keeps Arc off your back as a bonus.
Looting Mark 2 — Best for General Farming
If you're not doing a naked run and you just want to farm loot efficiently, the Looting Mark 2 is a fantastic blue-tier augment. Somewhat counterintuitively, it actually has more backpack space than several pink-tier looting augments, plus three built-in trinket compartments. The unique trait isn't exciting — auto-removing ticks after a second — but the base stats make it one of the best casual looting augments in the game.
Looting Mark III Survivor — Best Overall
Widely considered the best augment in the game by a large chunk of the community, and honestly, that reputation is earned. While it has slightly less backpack space than the Looting Mark 2, it offers more carry weight — ideal for hauling heavy items like Queen or Matriarch reactors. But its unique trait is what makes it truly special.
While downed and stationary, your health regenerates up to 75% of your max downed health. Essentially, if you don't move, you will never bleed out. You can wait indefinitely for a teammate or a helpful solo player with a defib. Even better — if you tap forward repeatedly, you can slowly crawl across the map without depleting your health bar. Getting downed doesn't have to mean losing the run.
Stop Being Afraid to Use the Snap Hook
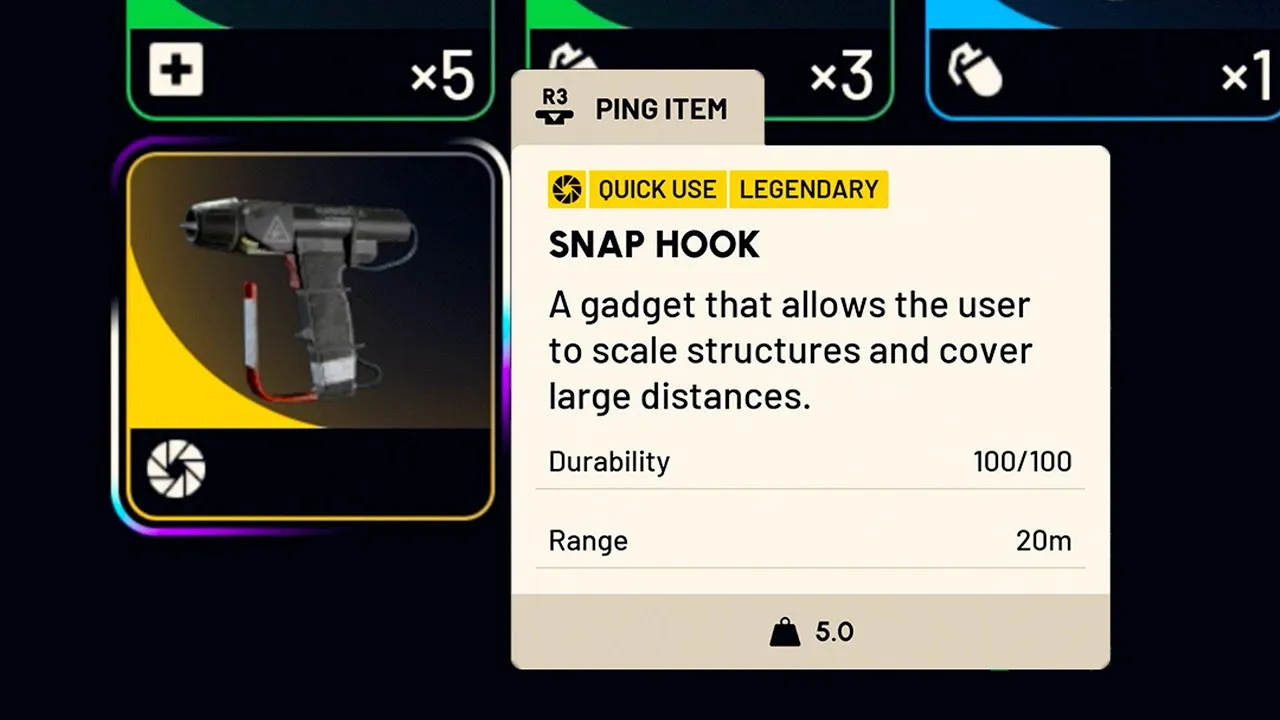 — Snap Hook —
Credit: Embark Studios
— Snap Hook —
Credit: Embark Studios
This is a surprisingly common mistake — even among veteran players. Rare, high-tier items like the Snap Hook sit in players' stashes collecting dust because they're terrified of losing them the moment they take them topside.
Here's the thing: fun items are meant to be used. And that's exactly what the safe pocket is for.
The play is simple: bring your Snap Hook into a match with it sitting in your safe pocket. Whenever you want to use it, pull it into your quick slot, use it, and then immediately while you're mid-flight, open your inventory and return it to your safe pocket. It takes a bit of practice but it genuinely becomes second nature quickly.
If you're nervous about the mechanics, hit the practice range first and drill the pull-out, use, and safe-pocket routine until it's muscle memory. Don't let good gear rot in the stash. Get out there and use it.
Safe Pocket Prioritization: What to Carry and What to Burn
Your safe pocket is the single most important inventory tool in Arc Raiders. After 500 hours, here's the hard rule: treat your safe pocket slots as if they're worth more than your entire backpack combined — because in many runs, they are.
The Safe Pocket Hierarchy
Tier 1 — Mission-Critical (Always protect): Rare crafting materials for active projects. If you're farming Assessor Matrices, Queen reactors, or any project-specific component, those go into the safe pocket before anything else. No exceptions.
Tier 2 — High-Value Gambles (Situational): High-credit items like augment blueprints, rare weapon mods, and vendor keys. The rule here is simple: if an item sells to Spiranza for more than 8,000 credits and fits in a single safe pocket slot, it's worth protecting. Below that threshold, it's competing with healing and utility.
Tier 3 — Survival Essentials (Always keep in pocket, cycle as needed): At minimum, keep one Adrenaline Shot, one medium heal, and one shield battery in your safe pocket at all times. Even on a naked run where your bag is empty and you're willing to lose everything, these three items give you the ability to turn a zero-profit death into a survival story.
The Burn Pouch Strategy
Your backpack is disposable. Internalise that and it changes how you play. Load your backpack with items you're willing to lose, and use them aggressively. If you have a grenade in your bag, throw it. If you have a spare weapon, push that fight. Gear in your backpack hasn't been extracted yet and doesn't count as profit.
The players who extract with the most value over time aren't the ones who hoard the hardest. They're the ones who make fast decisions about what to keep, what to burn, and when the safe pocket swap is worth the inventory menu time.
Squad Composition and Communication: The Force Multiplier
After 500 hours, the single biggest predictor of a squad's success isn't gear — it's whether they communicate effectively during contact.
Roles That Work
In PvP squad play, the most effective compositions in the current meta lean on three distinct roles:
- Point Raider (Entry): Runs a medium shield with an assault rifle or SMG. Their job isn't to get the kill — it's to take the first engagement, land suppression fire, and call out enemy position and armour type before committing to the full fight.
- Support Raider (Flex): Runs a heavy shield with a long-range weapon. Their job is to cover the point raider's retreat, provide suppressing fire during repositioning, and carry the squad's spare healing and utility. If the point goes down, the support pushes in with the shield advantage.
- Flank Raider (Recon): Runs light armour with a silent weapon. Their job is to break line of sight during the engagement and re-approach from an unexpected angle while the enemy is focused on the point and support.
Communication During Contact
The one callout that separates good squads from bad ones: "I'm down" is useless. "Sniper, Town Hall roof, west window, one shot left" wins fights.
Train your squad to call:
- Direction — where the enemy is relative to your position or a map landmark
- Distance — close (within 20m), medium (20-50m), or far (50m+)
- Armour type — light, medium, or heavy shield
- Status — shields up, shields broken, one-shot, revived
- ARC presence — whether the fight is about to get complicated by patrols
After the fight, a quick loot and go is usually the right call. Linger too long and you attract the third party that wipes your squad while you're sorting backpacks.
Map-Specific Survival Rules
Each map in Arc Raiders has a distinct flow and a common mistake players make on it. Here's the one rule per map that would have saved me the most deaths:
Dam Battlegrounds
Don't take the high ground without checking the zip lines first. The elevated paths are death traps if an enemy squad decides to push the zip line while you're exposed. Always clear the zip landing zones before committing to an elevated position.
Buried City
Town Hall is a third-party magnet. Every squad on the map can hear a fight in Town Hall. If you engage there, assume you have 90 seconds before another team arrives. Loot fast and leave, or disengage entirely and wait for them to clean each other up.
Spaceport
The open concourses are kill zones. Don't cross open areas without checking both sight lines. The long sight lines on Spaceport favour whoever has the ranged advantage. If you're running SMGs or shotguns, stay inside the buildings and force close-quarters engagements.
Bluegate
Night raids on Bluegate are a different game. The spawn rate increase for Sentinels and ARC is real, but so is the PvP density. Every player on a night Bluegate run is there for a reason — assume they're geared, assume they're aggressive, and plan your route to avoid the high-traffic chokepoints unless you're hunting PvP.
Stella Montis
The atrium is a sniper's paradise. If you need to cross the atrium, smoke it. Don't rely on speed alone. A single well-positioned sniper can lock down the entire central area, and the revive on a downed teammate in the open is nearly impossible under fire.
Final Thoughts
Arc Raiders rewards players who pay attention to the details. The green skill tree, naked farming runs, understanding how matchmaking responds to your behaviour, choosing the right augments, managing your inventory with discipline, communicating effectively with your squad, and respecting each map's unique threat profile — these are the kinds of decisions that separate good Raiders from great ones. Take these lessons, apply them to your runs, and you'll start noticing the difference almost immediately.
Good luck out there. Loot smart, stay alive, and keep your safe pocket ready.